- The MIDI standard celebrated its 30th anniversary in 2013. But voltage-based instrument control goes back even further. Moog and Buchla made their first analog sequencers back in the early '60s. One could reasonably argue that for a technology that's been around that long, there hasn't been too much innovation over the years. The bog-standard piano roll and step sequencer that you'll find in your DAW of choice remains, for the most part, the same as every other one out there. WaveDNA, a Toronto-based company whose only product is called Liquid Rhythm, is trying to challenge this status quo.
So what is it? It can be categorized in a few different ways, but essentially it's a sequencer instrument. It can be run as a standalone app or a plug-in (VST, AU or RTAS) on both OSX and Windows. If you're an Ableton Live user with Max For Live, you have an additional option called Liquid Clips that's designed to control clips within the software. Installation is pretty straightforward, but one caveat is that you can only install it on two computers with a single license.
On first pass, you may wonder if you've accidentally opened a new DAW. That's because in many ways Liquid Rhythm looks like one, with a horizontal arranger timeline centrally positioned and surrounded by various side panels. The arranger panel is where you build your sequences, with each row sequencing its own sample. To add new track rows to the arrangement, you can either load a kit or individual sounds from the library pane that sits off to the left. By default, WaveDNA includes four kits to get you started, but you can download from an additional selection of free-of-charge kits from within the app itself. You can also load your own samples and build custom kits from those. The ability to shape sounds once they're in Liquid Rhythm is rather limited, though—there are no envelope or filter controls. To that end, I found myself doing what I would assume many Liquid Rhythm users do: using its MIDI capabilities to sequence other instruments.
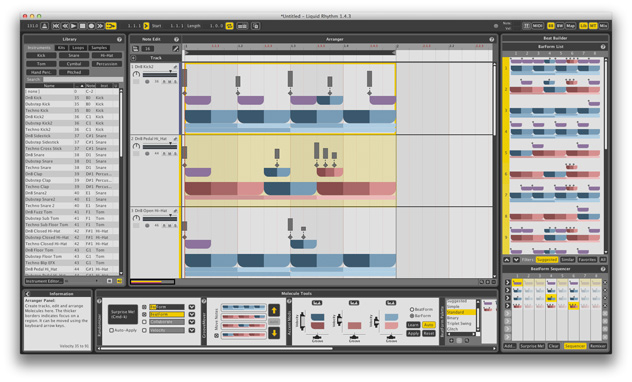 Sequencing is really what Liquid Rhythm is all about, so it's important to understand how it works. You build your sequence for each sound one bar at a time using what WaveDNA calls "molecules." A molecule is essentially just a single bar of music that Liquid Rhythm divides into different sections a few different ways. The first and most obvious way are the eighth-note sections called "beatforms." This is where the notes actually reside, and there are a bunch of different flavors of beatforms available to you, ranging from simple (a single 1/8-note) to complex (1/32-note combos). The second way bars are divided resides at a higher level, putting together two or three beatform sections to create what's called a "barform." In both cases, Liquid Rhythm uses color-coding to visually represent what's going on. Beatforms and barforms can have their own sections, for example a 1/16-note beatform has two halves. The colors of these sections are used to assign accents, and as such are noted as "strong," "medium" and "weak."
To do anything with those accent categories, you need to use a device called Accent Modifiers, which is one of a set of tools in Liquid Rhythm that are used to transform the molecules in your sequence. This particular one lets you set the MIDI velocity and timing based on accent color. Thankfully you can set a range for these values, and the Accent Modifiers tool will randomize within that range to add a more human feel to your sequence. Even more randomization is possible with another device called The Randomizer, which lets you alter your sequence by chance. You can tailor what the randomization is targeting, which is important, as it can pretty easily make a mess of your beat if you let it run untethered.
Sequencing is really what Liquid Rhythm is all about, so it's important to understand how it works. You build your sequence for each sound one bar at a time using what WaveDNA calls "molecules." A molecule is essentially just a single bar of music that Liquid Rhythm divides into different sections a few different ways. The first and most obvious way are the eighth-note sections called "beatforms." This is where the notes actually reside, and there are a bunch of different flavors of beatforms available to you, ranging from simple (a single 1/8-note) to complex (1/32-note combos). The second way bars are divided resides at a higher level, putting together two or three beatform sections to create what's called a "barform." In both cases, Liquid Rhythm uses color-coding to visually represent what's going on. Beatforms and barforms can have their own sections, for example a 1/16-note beatform has two halves. The colors of these sections are used to assign accents, and as such are noted as "strong," "medium" and "weak."
To do anything with those accent categories, you need to use a device called Accent Modifiers, which is one of a set of tools in Liquid Rhythm that are used to transform the molecules in your sequence. This particular one lets you set the MIDI velocity and timing based on accent color. Thankfully you can set a range for these values, and the Accent Modifiers tool will randomize within that range to add a more human feel to your sequence. Even more randomization is possible with another device called The Randomizer, which lets you alter your sequence by chance. You can tailor what the randomization is targeting, which is important, as it can pretty easily make a mess of your beat if you let it run untethered.
 If you're thinking this all sounds complex, I don't blame you. The WaveDNA developers certainly packed in an adventurous amount of terminology for users to get comfortable with. I haven't even really scratched the surface of the different devices that are available in Liquid Rhythm. Tools with names like the GrooveMover, the Beatform Tumbler and the BeatBuilder/BeatWeaver are all worthy of discussion, but they exist to do essentially the same thing: generate beats for you. If you dedicate the time to get comfortable with the somewhat esoteric way of operating, there is undoubtedly some power to be found.
Where Liquid Rhythm seems to excel the most is whipping a beat together quickly. It has the ability to suggest one-bar rhythms based on the selected instrument type, so if you're generating a bar for a kick, for example, it'll look different than the suggestion for a snare. My issue with this is that the suggestions are based on what some would consider cookie-cutter 4/4 beats. Consequently, I found it difficult to generate unique rhythms without resorting to the randomization tools, which often swung things to the opposite end of the spectrum, resulting in a loss of groove. Maybe with more time and experience I might feel differently, but I'm not sure that it brings enough to the table to make the ends justify those means.
Ratings:
Cost: 2.8
Versatility: 4.3
Sound: 2.5
Ease of use: 2.3
If you're thinking this all sounds complex, I don't blame you. The WaveDNA developers certainly packed in an adventurous amount of terminology for users to get comfortable with. I haven't even really scratched the surface of the different devices that are available in Liquid Rhythm. Tools with names like the GrooveMover, the Beatform Tumbler and the BeatBuilder/BeatWeaver are all worthy of discussion, but they exist to do essentially the same thing: generate beats for you. If you dedicate the time to get comfortable with the somewhat esoteric way of operating, there is undoubtedly some power to be found.
Where Liquid Rhythm seems to excel the most is whipping a beat together quickly. It has the ability to suggest one-bar rhythms based on the selected instrument type, so if you're generating a bar for a kick, for example, it'll look different than the suggestion for a snare. My issue with this is that the suggestions are based on what some would consider cookie-cutter 4/4 beats. Consequently, I found it difficult to generate unique rhythms without resorting to the randomization tools, which often swung things to the opposite end of the spectrum, resulting in a loss of groove. Maybe with more time and experience I might feel differently, but I'm not sure that it brings enough to the table to make the ends justify those means.
Ratings:
Cost: 2.8
Versatility: 4.3
Sound: 2.5
Ease of use: 2.3