- Native Instruments came out strong with one crystallized theme this year, beamed from their home base in Berlin—Maschine is going to be a big part of its future. If it wasn't made clear enough by the sweeping of their Kore product line (along with its long-developed suite of sample and preset expansion packs) under the Maschine umbrella, it became immediately evident this September when they introduced the Maschine Trinity. Being added to the newly-made-classic Maschine is Mikro, a new smaller controller with the same software, and iMaschine, an iOS app that distills the essentials of the original into the form factor of an iPhone screen.
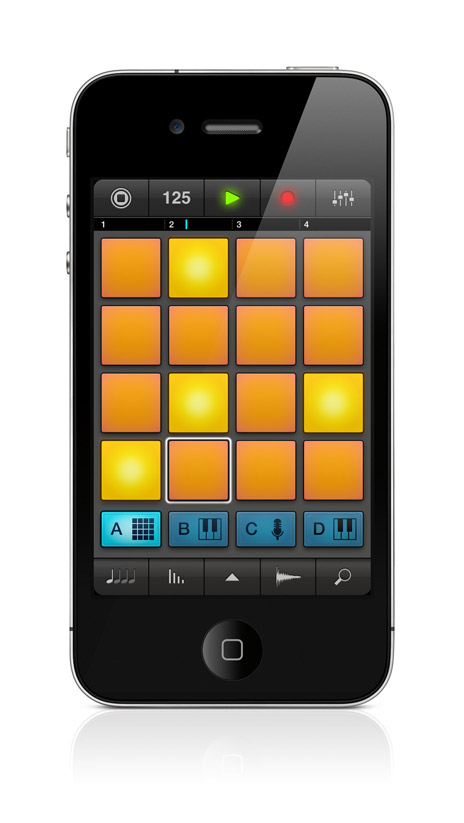
First, we had a go with iMaschine. Since it's billed as the on-the-go sketchpad of the bunch, it seemed like the proper place to begin working on a tune. iMaschine requires iOS 4.3 or higher and at the time of writing is an iPhone native application—which is a departure from the norm of late, with many of the more recent music production apps being designed for the iPad's larger screen. The layout is straightforward, with four groups that can house your choice of a 16 pad sample matrix, a two-tier keyboard or an audio recorder.
To get you started, Native Instruments provides 25 different kits and 400 samples, which is certainly enough variety to get moving down the road of making beats. If you need more variety you have a few options at hand. You can record your own sounds one at a time using the device's mic, or you can load sounds (in 16 bit 44.1 kHz WAV format) into iMaschine using iTunes. There are also in-app purchase options that give you kits culled from some of the same expansion packs that are available for the regular version of Maschine (like Transistor Punch, Vintage Heat and True School).
Unlike the standard version of Maschine, you can't sequence different pitches for a sample in a pad group in iMaschine. However, any of the samples in the library can be loaded onto a keyboard group, which then allows the sample to be played across all eight octaves of a standard piano keyboard. The base pitch of a sample is one of the attributes that can be edited via the slider along with gain, pan and glide—and there are switches as well to toggle one-shot and mono modes. For a mobile app this is a pretty impressive amount of flexibility, but there are a few things—like separate filters or EQ per sample—that would make iMaschine that much more useful (on the off chance that there are any spare processor cycles available).
 Moving past the pad and keyboard modes for the groups, you find the audio recorder mode. Typically you could use this to record vocals on top of your beat, but depending on your needs you could configure iMaschine as a full-on four track recorder, which is pretty interesting. While recording, the iMaschine sequencer will conveniently auto-expand the current sequence to the length of the recording, which is a very nice touch. To round things out, there is a mixer to control the levels of each group, and each channel can also be toggled to send signal to two separate FX units (which can house Delay, Flanger, Chorus, LoFi, HP, BP and LP filters).
After a short while using iMaschine, we came up with something that we were ready to polish up on the computer. The export options to get there are also pretty straightforward—beats can be uploaded directly to SoundCloud, or can be exported to both audio file and self-contained Maschine project formats. Once that's done, a zip file can be pulled out of iTunes and extracted to your directory of choice. This process still has some rough edges, though: we found that Maschine wouldn't open the iMaschine project file format from its menu, but double-clicking on the project file itself did the trick. Also, the sample and group level settings were skewed in the translation from iMaschine to Maschine, but that wasn't too tough to fix manually. Overall, it's a simple and efficient process.
Once we had everything loaded successfully in Maschine, we got to work on the other of the new additions to the Maschine Trinity, the Maschine Mikro controller. Having been long time users of the original Maschine controller, we were in for a bit of a shock when we got the Mikro in our hands for the first time. It's roughly two thirds of the size of the original, and to make up that space Native Instruments traded the two LED screens and eight control knobs of the original in favor of one smaller screen and one "master knob." In addition, the Mikro controller has a few less buttons, and doesn't have the MIDI ports of the original. There have been some advances, though: the Mikro's pads have a slightly better feel when compared with the original, and are now backlit by multi-color LEDs which switch from the normal orange to blue for navigational purposes.
Moving past the pad and keyboard modes for the groups, you find the audio recorder mode. Typically you could use this to record vocals on top of your beat, but depending on your needs you could configure iMaschine as a full-on four track recorder, which is pretty interesting. While recording, the iMaschine sequencer will conveniently auto-expand the current sequence to the length of the recording, which is a very nice touch. To round things out, there is a mixer to control the levels of each group, and each channel can also be toggled to send signal to two separate FX units (which can house Delay, Flanger, Chorus, LoFi, HP, BP and LP filters).
After a short while using iMaschine, we came up with something that we were ready to polish up on the computer. The export options to get there are also pretty straightforward—beats can be uploaded directly to SoundCloud, or can be exported to both audio file and self-contained Maschine project formats. Once that's done, a zip file can be pulled out of iTunes and extracted to your directory of choice. This process still has some rough edges, though: we found that Maschine wouldn't open the iMaschine project file format from its menu, but double-clicking on the project file itself did the trick. Also, the sample and group level settings were skewed in the translation from iMaschine to Maschine, but that wasn't too tough to fix manually. Overall, it's a simple and efficient process.
Once we had everything loaded successfully in Maschine, we got to work on the other of the new additions to the Maschine Trinity, the Maschine Mikro controller. Having been long time users of the original Maschine controller, we were in for a bit of a shock when we got the Mikro in our hands for the first time. It's roughly two thirds of the size of the original, and to make up that space Native Instruments traded the two LED screens and eight control knobs of the original in favor of one smaller screen and one "master knob." In addition, the Mikro controller has a few less buttons, and doesn't have the MIDI ports of the original. There have been some advances, though: the Mikro's pads have a slightly better feel when compared with the original, and are now backlit by multi-color LEDs which switch from the normal orange to blue for navigational purposes.
 Without a doubt, the biggest adjustment for users of the original Maschine controller will be getting used to the new navigation system. The navigation was intuitive using the original controller thanks to the eight buttons above the displays. Mikro has an entirely different system, based around the new NAV button below the display. While holding this button, you have access to the setup and module screens at each level of the Maschine hierarchy, starting at the Master level and moving down to the Group and Sound levels.
For example, if you wanted to adjust the filter on a given sample loaded onto a pad, you would switch to the Sound level by hitting the F3 button, then hold NAV and hit F3 again to make sure you're navigating through the four modules Maschine provides for this sound. While holding NAV, the pads turn into navigational buttons, with the top four pads jumping between the modules and the bottom eight pads pointing to the different sections of controls belonging to the device in the selected module. Once you navigate to the filter section of the sampler module, you can then switch between the separate filter controls using NAV and the arrow buttons, and adjust each using the master knob. This definitely takes some getting used to, but with some practice it gets easier.
The Mikro's parameter control using the master knob has a couple of notable downsides. First, the knob itself is detented rather than continuous, so by default the changes to a parameter might be larger and more stepped than you'd like. You can remedy this in a way by holding the shift button while turning the knob, which makes for more accurate changes. However, this means that there is no way to do a fast continuous change like a filter sweep from the Mikro itself. Also, and probably more importantly, the Mikro does not allow for parameters to be automated from the controller, which depending on the style of music you're creating can be a pretty big drawback. You can work around both of these limitations by using the mouse or by controlling Maschine with another MIDI controller using the group macro controls (but you are limited to controlling eight parameters per group).
Due to these limitations, the original Maschine controller still remains our favorite due to its ease of navigation, parameter automation, and MIDI interface, but certainly we came away impressed by both iMaschine and Maschine Mikro. Despite the reduced feature set demanded by their smaller physical interfaces, they more than make up for it in portability and cost. iMaschine is currently available for $4.99 in the iTunes App Store which is probably less than the last drink you paid for, and will most likely provide you with a good bit more fun too. Maschine Mikro, which ships with the full version of Maschine, can be had for around $349—a full $250 less than the original. (It's also worth noting that Native Instruments is running a deal right now giving away a free expansion pack if you purchase Mikro before December 31st.) These are both tremendous bargains, and for many people it's all they would need to get going in music production.
Ratings
Cost: 5/5
Sound: 5/5
Versatility: 4/5
Ease of use: 4/5
Without a doubt, the biggest adjustment for users of the original Maschine controller will be getting used to the new navigation system. The navigation was intuitive using the original controller thanks to the eight buttons above the displays. Mikro has an entirely different system, based around the new NAV button below the display. While holding this button, you have access to the setup and module screens at each level of the Maschine hierarchy, starting at the Master level and moving down to the Group and Sound levels.
For example, if you wanted to adjust the filter on a given sample loaded onto a pad, you would switch to the Sound level by hitting the F3 button, then hold NAV and hit F3 again to make sure you're navigating through the four modules Maschine provides for this sound. While holding NAV, the pads turn into navigational buttons, with the top four pads jumping between the modules and the bottom eight pads pointing to the different sections of controls belonging to the device in the selected module. Once you navigate to the filter section of the sampler module, you can then switch between the separate filter controls using NAV and the arrow buttons, and adjust each using the master knob. This definitely takes some getting used to, but with some practice it gets easier.
The Mikro's parameter control using the master knob has a couple of notable downsides. First, the knob itself is detented rather than continuous, so by default the changes to a parameter might be larger and more stepped than you'd like. You can remedy this in a way by holding the shift button while turning the knob, which makes for more accurate changes. However, this means that there is no way to do a fast continuous change like a filter sweep from the Mikro itself. Also, and probably more importantly, the Mikro does not allow for parameters to be automated from the controller, which depending on the style of music you're creating can be a pretty big drawback. You can work around both of these limitations by using the mouse or by controlling Maschine with another MIDI controller using the group macro controls (but you are limited to controlling eight parameters per group).
Due to these limitations, the original Maschine controller still remains our favorite due to its ease of navigation, parameter automation, and MIDI interface, but certainly we came away impressed by both iMaschine and Maschine Mikro. Despite the reduced feature set demanded by their smaller physical interfaces, they more than make up for it in portability and cost. iMaschine is currently available for $4.99 in the iTunes App Store which is probably less than the last drink you paid for, and will most likely provide you with a good bit more fun too. Maschine Mikro, which ships with the full version of Maschine, can be had for around $349—a full $250 less than the original. (It's also worth noting that Native Instruments is running a deal right now giving away a free expansion pack if you purchase Mikro before December 31st.) These are both tremendous bargains, and for many people it's all they would need to get going in music production.
Ratings
Cost: 5/5
Sound: 5/5
Versatility: 4/5
Ease of use: 4/5