- Spanish "DIY electronic sound machines" company Plankton Electronics' first project is The Jellyfish double delay module. It's a single-input, double-output design with passive analog filtering and LFO modulation that also has CV capabilities. Available are the full kit with all components, the PCB board by itself and a black case pre-drilled and silk screened.
I'd rank the difficulty of this project as somewhere between beginner and intermediate. If you've never assembled a kit or soldered anything in your life, I'd recommend a simpler project or learning how to make cables before taking the plunge with The Jellyfish. If you've ever successfully soldered, then you are probably capable of completing this unit. You don't need a deep electronics knowledge; it's more of a color-by-numbers scenario. The assembly instructions are some of the best I've ever come across, with very clear photos every step of the way. I'd estimate that it took me eight or nine hours of total build time and everything worked perfectly upon first power-up. The only roadblock I hit was a bit of confusion over which jack was which, something that could have been remedied with a clearer manual entry on this one topic or a bit more of my own patience in double-checking things. Calibrating the unit took about another 30 minutes but was well worth the effort to fine-tune the delays and their filters, which are not accessible on the front panel. All that is needed for this project are the kit, a soldering iron, solder, wire cutters and a small Phillips-head screwdriver, plus a little patience and a good workspace.
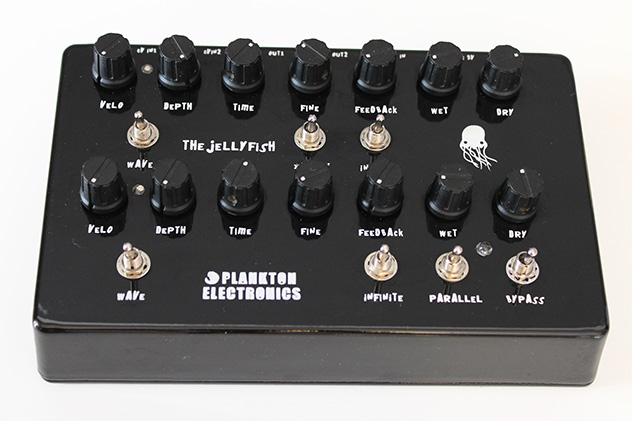 The Jellyfish's top panel is organized in two rows of knobs, one for each of the delays that are routed to their own outputs unless the Parallel switch is engaged, in which case both delays come out of Output 1. Each row begins with the LFO controls of Velo and Depth. Velo, normally called rate on most LFOs, modulates the delay time and has a range of 0.33 Hz to 3.12 Hz. This control is bypassed when something is plugged into the CV input, which then controls the LFO speed. The Wave switch toggles between triangle and square waves, but this is no ordinary square wave. The Schmitt trigger-generated wave does some rather out-of-the-ordinary things to the delay, introducing distortions and making the delay sound like it's getting ripped apart. This LFO effect can be very sci-fi and interesting. The next two controls are Time, with a range of 27 ms to 570 ms, and Fine Tune, which covers about 10 percent of the range of the main control. I found it hard to get both delays to line up to the exact same timing, but that's part of the charm of this unit—if you need a conventional, perfectly synced delay, there are certainly other options out there.
Each delay has its own feedback control with an Infinite switch below it. When engaged, the delay can carry on indefinitely, creating wonderful swirling noises that are very watery sounding (and possibly the reason for the name The Jellyfish). Also, the low-pass filters in the signal path create a notably dark delay that degenerates much like a real tape echo. The mix section provides each delay with knobs for both dry and wet mix, rather than a single knob for blending the two. In the middle of the two delays is the X-Delay switch, which sends the output of Delay 1 to the input of Delay 2 and vice-versa. The Feedback control of Delay 2 then controls its level. This feature is great for creating chaos.
I found this project to be very rewarding. It's satisfying to create music with something that you built by hand. The outcome is an excellent delay unit that is unlike anything I own or anything I've heard. I would've liked to have external control of the filters, but the designer had in mind a particular low-passed flavor. I am especially impressed by the uniqueness and unpredictability of the square-wave LFO, which introduces a ton of character into anything that I feed it. If you are up for the challenge, would like to learn a bit about electronics, and would like to build a great piece of kit for less than it would cost in a store, I highly recommend this project. Some electronics knowledge and soldering skills will also save you money down the road in repair bills.
(As an aside, I would also like to recommend the following pointers which would make this or any other project easier to complete: Work in a clean, well-lit and well-ventilated area. You need to see what you are doing and you also need to not lose any small parts. Most importantly, solder smoke is not healthy. Take a breath and blow out while the smoke is being created. Better yet, use a fan to redirect the smoke away from you and out a window. Wear goggles to protect your eyes. Get a soldering iron with an adjustable temperature and a fine point. And take your time and double check every connection before you make it and after it is made as well. This will save time in the end because problems can be difficult to trace later.)
Ratings:
Cost: 4/5
Sound: 4/5
Ease of use: 3.5/5
Versatility: 4/5
The Jellyfish's top panel is organized in two rows of knobs, one for each of the delays that are routed to their own outputs unless the Parallel switch is engaged, in which case both delays come out of Output 1. Each row begins with the LFO controls of Velo and Depth. Velo, normally called rate on most LFOs, modulates the delay time and has a range of 0.33 Hz to 3.12 Hz. This control is bypassed when something is plugged into the CV input, which then controls the LFO speed. The Wave switch toggles between triangle and square waves, but this is no ordinary square wave. The Schmitt trigger-generated wave does some rather out-of-the-ordinary things to the delay, introducing distortions and making the delay sound like it's getting ripped apart. This LFO effect can be very sci-fi and interesting. The next two controls are Time, with a range of 27 ms to 570 ms, and Fine Tune, which covers about 10 percent of the range of the main control. I found it hard to get both delays to line up to the exact same timing, but that's part of the charm of this unit—if you need a conventional, perfectly synced delay, there are certainly other options out there.
Each delay has its own feedback control with an Infinite switch below it. When engaged, the delay can carry on indefinitely, creating wonderful swirling noises that are very watery sounding (and possibly the reason for the name The Jellyfish). Also, the low-pass filters in the signal path create a notably dark delay that degenerates much like a real tape echo. The mix section provides each delay with knobs for both dry and wet mix, rather than a single knob for blending the two. In the middle of the two delays is the X-Delay switch, which sends the output of Delay 1 to the input of Delay 2 and vice-versa. The Feedback control of Delay 2 then controls its level. This feature is great for creating chaos.
I found this project to be very rewarding. It's satisfying to create music with something that you built by hand. The outcome is an excellent delay unit that is unlike anything I own or anything I've heard. I would've liked to have external control of the filters, but the designer had in mind a particular low-passed flavor. I am especially impressed by the uniqueness and unpredictability of the square-wave LFO, which introduces a ton of character into anything that I feed it. If you are up for the challenge, would like to learn a bit about electronics, and would like to build a great piece of kit for less than it would cost in a store, I highly recommend this project. Some electronics knowledge and soldering skills will also save you money down the road in repair bills.
(As an aside, I would also like to recommend the following pointers which would make this or any other project easier to complete: Work in a clean, well-lit and well-ventilated area. You need to see what you are doing and you also need to not lose any small parts. Most importantly, solder smoke is not healthy. Take a breath and blow out while the smoke is being created. Better yet, use a fan to redirect the smoke away from you and out a window. Wear goggles to protect your eyes. Get a soldering iron with an adjustable temperature and a fine point. And take your time and double check every connection before you make it and after it is made as well. This will save time in the end because problems can be difficult to trace later.)
Ratings:
Cost: 4/5
Sound: 4/5
Ease of use: 3.5/5
Versatility: 4/5