- If you had to design your ideal controller for Ableton, what would it look like? This question has been the center of much thoughtful discussion for years now. Some have tried their hand at ambitious projects. Robert Henke, for instance, with his monolithic MonoDeck, and Sasha's Maven were both custom controllers built around a core of MIDI hardware modules. More recently, a smattering of LED grid matrix controllers have been released (e.g. Akai APC40, Novation's Launchpad, the open source Monome project, Livid Ohm). The success of these traditional MIDI units is not in doubt, and they all provide a useful tactile interface for the basics of Ableton's unique GUI. Their usefulness, however, is limited to fundamental functions of Live (clip launching, volume faders, EQs). But what about those who want to dig deeper, for instance, into device control? Ableton attempted to make this easier with the "blue hand" auto mapping of device controls first introduced in version 7 of Live, a feature that has been supported by knob-based smart controllers like the Novation Remote series. This was a step in the right direction, but having the same layout for all devices can result in a less-than-intuitive experience. In an attempt to break through these limitations, one gear manufacturer took a stab at achieving the perfect controller for Ableton. That company is JazzMutant, manufacturer of the multi-touch controller Lemur, with their new app Mu.
JazzMutant aren't new to the DAW controller game. Over two years ago they released a bootable Lemur firmware called Dexter whose sole purpose was to provide an interface to traditional DAWs like Logic, Sonar, Cubase and Nuendo. Dexter afforded its users a (non-customizable) way to control mixer parameters, surround panning, EQ curves; the things you would expect to find in a conventional DAW. For years Ableton users pined for Dexter support for Live, but JazzMutant clearly had bigger plans.
Mu is a two-headed beast; the visual half of it is a multifaceted Lemur touchscreen template; the other half is an app written to interface between the Lemur template and Ableton via a Max for Live object. Therefore, to take advantage of Mu, one must own both Ableton Live 8 and Max for Live. For Lemur users who have made this (admittedly sizeable) investment, the good news is that JazzMutant have provided Mu as a free-of-charge download from their website. Once downloaded, the installation is relatively straightforward. The only groundwork required is to make the Mu resources available to Max (either by copying the folder into the Max/Cycling '74 directory or by adding it to the Max path). Once that is done, using Mu is as simple as dropping the Mu.amxd Max device into an Ableton session. At that point the Lemur touchscreen will jump to life, populated with a visual representation of the current set.
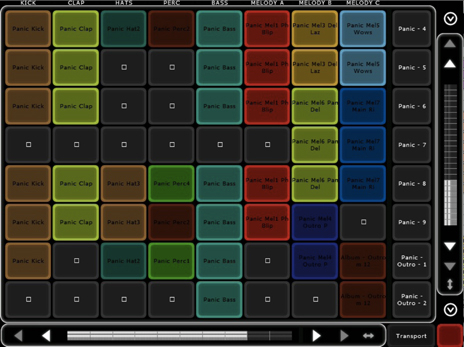 The Mu visual template is broken into three main parts: the main clip launching panel and two overlay panels that when not hidden split the screen real estate horizontally. The clip launching panel is as close to a visual mirror of Live's session view as one can get. It is sophisticated enough to show the real-time names and colors of tracks, clips and scenes, with the active clips flashing just as in Live. The horizontal and vertical scroll bars shift the "in-focus" matrix of clips (just like on the Launchpad or APC-40), but they also perform the supremely useful extra duty of allowing users to zoom vertically and horizontally, resizing the matrix as needed, freeing you from the 8x8 "gridlock" of hardware controllers. Users can change the timing of clip triggering (also known as global quantization) straight from the Lemur as well, via a popup menu found on the Transport bar.
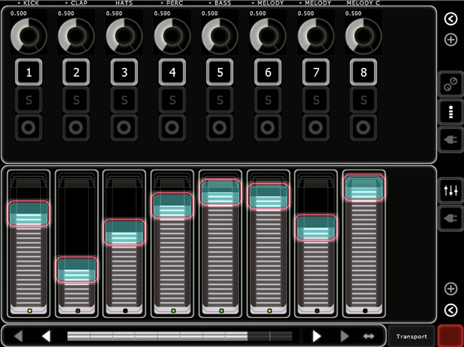
Almost everything other than clip-launching is handled in the aforementioned bottom and top overlay panels. The bottom panel is where you'll find the volume faders, each with their own little virtual activity LED (a nice touch). The top panel is the exclusive domain of two screens: sends/returns and pan/mute/solo. The sends/returns screen is the more interesting of the two in that it works backwards in a way. You select what return you want to control, and then you get a fader to control the amount of send to that return for each track in your set. On this screen you'll also find a button labeled "elastic" which links the send faders together by a virtual rubber band that snaps back into place when you take your finger off of the screen. It feels kind of gimmicky, but could generate some interesting effects if utilized correctly.
At this point you may be thinking "controller X can do pretty much everything you just mentioned." In addition to the standard controls listed above, though, each panel can host device control templates. This is where things start to get interesting. Essentially, what a device control template does is provide a customized Lemur interface for any device in Ableton Live. Out of the box Mu provides well-designed templates for almost all of the audio effects in Ableton's library. The EQ 8 template, for instance, allows you to control the frequency and Q setting of all eight nodes at once, and you can select individual nodes to adjust the settings of a specific filter. Using multi-touch control on the templates that feature gravity-enabled X/Y pads was just downright fun, and served as a good reminder of how much more powerful the Lemur is than standard MIDI controllers.
The Mu visual template is broken into three main parts: the main clip launching panel and two overlay panels that when not hidden split the screen real estate horizontally. The clip launching panel is as close to a visual mirror of Live's session view as one can get. It is sophisticated enough to show the real-time names and colors of tracks, clips and scenes, with the active clips flashing just as in Live. The horizontal and vertical scroll bars shift the "in-focus" matrix of clips (just like on the Launchpad or APC-40), but they also perform the supremely useful extra duty of allowing users to zoom vertically and horizontally, resizing the matrix as needed, freeing you from the 8x8 "gridlock" of hardware controllers. Users can change the timing of clip triggering (also known as global quantization) straight from the Lemur as well, via a popup menu found on the Transport bar.
Almost everything other than clip-launching is handled in the aforementioned bottom and top overlay panels. The bottom panel is where you'll find the volume faders, each with their own little virtual activity LED (a nice touch). The top panel is the exclusive domain of two screens: sends/returns and pan/mute/solo. The sends/returns screen is the more interesting of the two in that it works backwards in a way. You select what return you want to control, and then you get a fader to control the amount of send to that return for each track in your set. On this screen you'll also find a button labeled "elastic" which links the send faders together by a virtual rubber band that snaps back into place when you take your finger off of the screen. It feels kind of gimmicky, but could generate some interesting effects if utilized correctly.
At this point you may be thinking "controller X can do pretty much everything you just mentioned." In addition to the standard controls listed above, though, each panel can host device control templates. This is where things start to get interesting. Essentially, what a device control template does is provide a customized Lemur interface for any device in Ableton Live. Out of the box Mu provides well-designed templates for almost all of the audio effects in Ableton's library. The EQ 8 template, for instance, allows you to control the frequency and Q setting of all eight nodes at once, and you can select individual nodes to adjust the settings of a specific filter. Using multi-touch control on the templates that feature gravity-enabled X/Y pads was just downright fun, and served as a good reminder of how much more powerful the Lemur is than standard MIDI controllers.
 As with anything, there are some downsides to Mu. While most of Live's audio effects have template support in this initial version of Mu, none of the instruments do (save for a basic Drum Rack template). Also, doing detailed studio work with some of the audio effect templates can be difficult because of the lack of current value displays on sliders. Mu users who also own a full copy of Max can overcome these hurdles by designing their own device templates, or altering the ones shipped with Mu. Normal Max for Live users, however, are stuck with what JazzMutant ships. Another limitation of device control templates is that they're restricted to top level devices, so if you want to control a device nested in a rack, you're out of luck. The most notable of Mu's downsides has to be the cost of entry, however. At the time of writing the current street prices for the Lemur + Live 8 + Max for Live add up to roughly $2600. If you want the full version of Max that total jumps to about $2900.
It's difficult to make an even comparison between Mu and anything else on the market today. Just about the closest you can get is an iPad running the LiveControl template for TouchOSC. While this setup is significantly cheaper at around $500 and change, there are marked differences. Physically, the Lemur's wired connection is much more reliable than the iPad's Wi-Fi connection, and the construction of an iPad is much less durable than the Lemur. Logically there are obvious differences as well. LiveControl does provide a pretty impressive subset of what Mu can do, but there are major exceptions like the lack of device control templates and the ability to create user-defined interfaces.
So, have JazzMutant created the perfect controller for Live? Well, despite a few issues with the initial version, I think Mu is without a doubt the most useful tool for interacting with Ableton Live that exists today. The real question is whether or not it's worth the investment at this point in time. Multi-touch technology is advancing rapidly, and I believe that in the next year or two JazzMutant will either license their software to be used on other hardware, or someone will develop new something that surpasses it. If you are a financially sound artist in the market for the best live performance tool for Ableton right now, then you should absolutely give Mu a spin. For the rest, the best option may be to wait and hope that JazzMutant decides to release Mu for another platform in the near future.
Ratings:
COST: 3/5
BUILD: 4/5
VERSATILITY: 4/5
EASE OF USE: 4/5
As with anything, there are some downsides to Mu. While most of Live's audio effects have template support in this initial version of Mu, none of the instruments do (save for a basic Drum Rack template). Also, doing detailed studio work with some of the audio effect templates can be difficult because of the lack of current value displays on sliders. Mu users who also own a full copy of Max can overcome these hurdles by designing their own device templates, or altering the ones shipped with Mu. Normal Max for Live users, however, are stuck with what JazzMutant ships. Another limitation of device control templates is that they're restricted to top level devices, so if you want to control a device nested in a rack, you're out of luck. The most notable of Mu's downsides has to be the cost of entry, however. At the time of writing the current street prices for the Lemur + Live 8 + Max for Live add up to roughly $2600. If you want the full version of Max that total jumps to about $2900.
It's difficult to make an even comparison between Mu and anything else on the market today. Just about the closest you can get is an iPad running the LiveControl template for TouchOSC. While this setup is significantly cheaper at around $500 and change, there are marked differences. Physically, the Lemur's wired connection is much more reliable than the iPad's Wi-Fi connection, and the construction of an iPad is much less durable than the Lemur. Logically there are obvious differences as well. LiveControl does provide a pretty impressive subset of what Mu can do, but there are major exceptions like the lack of device control templates and the ability to create user-defined interfaces.
So, have JazzMutant created the perfect controller for Live? Well, despite a few issues with the initial version, I think Mu is without a doubt the most useful tool for interacting with Ableton Live that exists today. The real question is whether or not it's worth the investment at this point in time. Multi-touch technology is advancing rapidly, and I believe that in the next year or two JazzMutant will either license their software to be used on other hardware, or someone will develop new something that surpasses it. If you are a financially sound artist in the market for the best live performance tool for Ableton right now, then you should absolutely give Mu a spin. For the rest, the best option may be to wait and hope that JazzMutant decides to release Mu for another platform in the near future.
Ratings:
COST: 3/5
BUILD: 4/5
VERSATILITY: 4/5
EASE OF USE: 4/5