- You might not be familiar with Cableguys. Based in Germany, this small company boasts a growing roster of affordable effects plugins, including FilterShaper, VolumeShaper, MidiShaper and PanCake. These have all been designed to encourage movement into your sounds, with each, as you'd expect from their names, targeted at a specific sound manipulation area. Curve 2 is born of the same mindset—that static parameters are less fun and sonically enriching than moving ones—but unlike the Cableguys' other titles, rather than limiting itself to one specific area of sonic manipulation, Curve 2 is a fully-fledged synthesizer. As we'll see, it's one with more than a few tricks to show off too.
In some ways Curve 2 behaves like many other subtractive synths but in others, it's unlike almost any other synth you care to think of. Once you've marveled at the wide range of great-sounding programs in the preset library (which, incidentally, features a database of free user patches which you can update via a quick in-plugin web-browse any time you like), the easiest way to understand Curve 2's capabilities is to build a new program from scratch.
The oscillator section comes first. It's slightly reminiscent of Native Instruments' Massive, as three lines of sound waves lie atop one another with semitone tuning available via the pitch dial alongside detune, pan and volume settings for each in rows. However, there's more here than meets the eye, as each row can actually feature two "waves" as Cableguys call them. If you choose a second sound source, a crossfade dial appears, so you can blend the balance between each oscillator's twin sound sources.
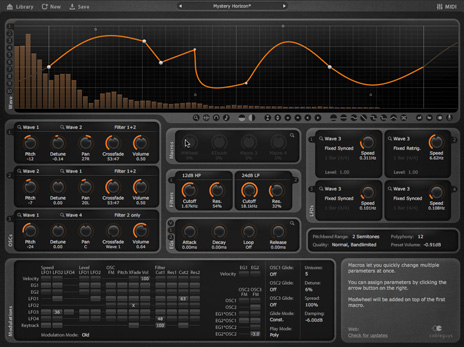 Which waveforms are available as start points? Well, this is where things start to get really interesting. Curve gets its name from the fact that almost any shape can be drawn for a number of "stages" within the synthesis path, starting with the oscillators. So, in an empty patch, if you select Wave 1 from the drop-down menu, you'll be greeted with a sine wave, which will display at the top of the GUI. However, you can immediately warp this, both by pulling the central "dot" around but also by adding more dots and manipulating these to create a more complicated waveform. As any synthesis enthusiast will know, changing the waveform manipulates the balance between the harmonics present and you'll see these as a series of brown bars behind the orange shape.
Once you've created Wave 1 you can then select Wave 2 and shape that to your heart's content as well. Effectively, for any new program, you can create a bank of up to 10 Waves with two available per oscillator. If you're wondering why there are 10 Waves when there are only six available locations for these across the three oscillators, read on. Additionally, there are frequency modulation options, a unison mode for fatter sounds and a noise generator option within the Wave drop-down menu.
The middle column of Curve's GUI provides control for the twin filters, the envelopes and "macros." The filters are simple affairs with cutoff and resonance controls becoming available for each once you've chosen a filter type. There are 10 of these in total with high pass, low pass, band pass, peak and notch modes available at a "strength" of 12dB/octave. LP, HP and BP are available at 24db/octave and more subtle LP and HP options at 6dB/octave. Each oscillator can feed into multiple filter options; one or the other, or one and then the other and so on, with a filter bypass option available on a per-oscillator basis too.
There are three envelopes, one dedicated to volume and the other two freely routable, with each envelope featuring attack, decay, loop and release portions. Like the waveforms, envelopes can be drawn and while the attack, decay and release portions will be familiar as single event stages, the loop portion can also feature break-point envelopes which provide multiple points, adorned with curves if you so choose, created in the same way as the oscillator Waves. You can also make gated-style pads as you hold down a chord, or create siren-like pitch effects without the predictability of regular LFO movement. The possibilities are limitless.
The upper-most pane introduces macros, which provide powerful levels of sonic control from just four unassuming dials. A click of the magnifying glass here allows you to set up multiple parameters to be controlled via movement of each dial, with lists of which parameters will change chosen by you. To assign a parameter, simply grab the compass point of an empty location and drop this onto the function of your choice. Then you can set the amount of modulation, as well as being able to select positive or negative offsets to dictate the direction of movement. Once you've set up your four lists, macros can either be radical sonic shifters or gentle enhancers of a current parameter set. Macros can be routed to hardware control dials of your choice, so the possibilities for real-time sonic manipulation become very impressive very quickly.
Which waveforms are available as start points? Well, this is where things start to get really interesting. Curve gets its name from the fact that almost any shape can be drawn for a number of "stages" within the synthesis path, starting with the oscillators. So, in an empty patch, if you select Wave 1 from the drop-down menu, you'll be greeted with a sine wave, which will display at the top of the GUI. However, you can immediately warp this, both by pulling the central "dot" around but also by adding more dots and manipulating these to create a more complicated waveform. As any synthesis enthusiast will know, changing the waveform manipulates the balance between the harmonics present and you'll see these as a series of brown bars behind the orange shape.
Once you've created Wave 1 you can then select Wave 2 and shape that to your heart's content as well. Effectively, for any new program, you can create a bank of up to 10 Waves with two available per oscillator. If you're wondering why there are 10 Waves when there are only six available locations for these across the three oscillators, read on. Additionally, there are frequency modulation options, a unison mode for fatter sounds and a noise generator option within the Wave drop-down menu.
The middle column of Curve's GUI provides control for the twin filters, the envelopes and "macros." The filters are simple affairs with cutoff and resonance controls becoming available for each once you've chosen a filter type. There are 10 of these in total with high pass, low pass, band pass, peak and notch modes available at a "strength" of 12dB/octave. LP, HP and BP are available at 24db/octave and more subtle LP and HP options at 6dB/octave. Each oscillator can feed into multiple filter options; one or the other, or one and then the other and so on, with a filter bypass option available on a per-oscillator basis too.
There are three envelopes, one dedicated to volume and the other two freely routable, with each envelope featuring attack, decay, loop and release portions. Like the waveforms, envelopes can be drawn and while the attack, decay and release portions will be familiar as single event stages, the loop portion can also feature break-point envelopes which provide multiple points, adorned with curves if you so choose, created in the same way as the oscillator Waves. You can also make gated-style pads as you hold down a chord, or create siren-like pitch effects without the predictability of regular LFO movement. The possibilities are limitless.
The upper-most pane introduces macros, which provide powerful levels of sonic control from just four unassuming dials. A click of the magnifying glass here allows you to set up multiple parameters to be controlled via movement of each dial, with lists of which parameters will change chosen by you. To assign a parameter, simply grab the compass point of an empty location and drop this onto the function of your choice. Then you can set the amount of modulation, as well as being able to select positive or negative offsets to dictate the direction of movement. Once you've set up your four lists, macros can either be radical sonic shifters or gentle enhancers of a current parameter set. Macros can be routed to hardware control dials of your choice, so the possibilities for real-time sonic manipulation become very impressive very quickly.
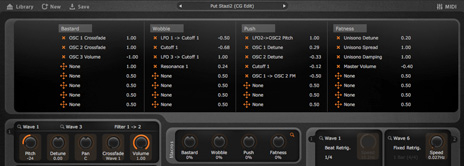 When it comes to LFO control, you'll be delighted to hear that the waveforms available are the very same as those you created at the oscillator stage, which helps explain why 10 are available rather than six. There are four independent LFOs within Curve 2. In this way, you could create four Waves specifically for modulation, rather than as potential sound sources, for instance. Once you've selected an LFO waveform, you can then decide how it will trigger, whether it will do so freely or beat-sync'd to host tempo, with plenty of other choices besides. In terms of routing LFOs these, alongside other parameters, can be assigned to multiple modulation destinations at the bottom of the screen via a detailed matrix. This lists control sources and targets, so to make an assignment, it's a simple case of marrying two together and then dragging up or down to set the amount the two will interact.
Curve 2 is a programmer's dream. If you're a synth enthusiast, you'll love how the shackles of having only four stage envelopes come flying off, quite aside from the fact that each sound you build with this instrument will be formed of oscillator waves you'll have sculpted yourself. Yes, it takes a little getting used to and no, it doesn't feature any internal effects. But don't let either of these things put you off—Curve is well worth it anyway, as it genuinely rewards experimentation.
Ratings:
Cost: 4.5/5
Versatility: 4/5
Sound: 4/5
Ease of use: 3/5
When it comes to LFO control, you'll be delighted to hear that the waveforms available are the very same as those you created at the oscillator stage, which helps explain why 10 are available rather than six. There are four independent LFOs within Curve 2. In this way, you could create four Waves specifically for modulation, rather than as potential sound sources, for instance. Once you've selected an LFO waveform, you can then decide how it will trigger, whether it will do so freely or beat-sync'd to host tempo, with plenty of other choices besides. In terms of routing LFOs these, alongside other parameters, can be assigned to multiple modulation destinations at the bottom of the screen via a detailed matrix. This lists control sources and targets, so to make an assignment, it's a simple case of marrying two together and then dragging up or down to set the amount the two will interact.
Curve 2 is a programmer's dream. If you're a synth enthusiast, you'll love how the shackles of having only four stage envelopes come flying off, quite aside from the fact that each sound you build with this instrument will be formed of oscillator waves you'll have sculpted yourself. Yes, it takes a little getting used to and no, it doesn't feature any internal effects. But don't let either of these things put you off—Curve is well worth it anyway, as it genuinely rewards experimentation.
Ratings:
Cost: 4.5/5
Versatility: 4/5
Sound: 4/5
Ease of use: 3/5