- DAWs are updated so regularly these days that you might be surprised that a decimal-place revision of Logic Pro X is worthy of a review. But Logic Pro 10.1 isn't your average update. Rather than simply addressing a few bugs, it brings with it an extensive collection of new features that are likely to turn the heads of those who aren't yet using Logic Pro as their central workstation software.
Perhaps the most significant new features centre on beat creation. When Logic Pro moved from Version 9 to X, it brought with it a new track type named Drummer that provides an intelligent engine designed to help you create more realistic acoustic drum patterns. Drummer has been expanded in 10.1 to include beatmakers in two categories, Electronic and Hip-Hop.
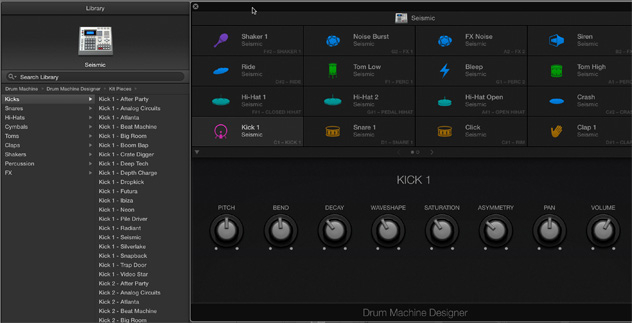
For the uninitiated, it works like this. Once you've selected a Drummer track, you can browse through a series of avatars to choose a "producer" whose description best matches the type of drum feel you're looking for. To the right of this selection, an X-Y pane then allows you to choose an overall setting, which balances between loud and soft playing and simple and complex pattern generation. Then, you can make further tweaks for kick and snare, hi-hat and cymbal patterns and the (optional) inclusion of percussion. In Logic Pro X, Drummer fed this pattern generation into the Drum Kit Designer, but with the expansion of this kind of beat generation into electronic music comes a new instrument: Drum Machine Designer. While this is the default plug-in for electronic Drummer tracks, it can also be set up as a regular software instrument, with its sounds mapped to different MIDI notes. You can either select entire kits or create hybrid ones, whereby different kicks, snares, hats and percussion sources can be loaded individually onto virtual pads.
Additionally, Drum Machine Designer makes comprehensive use of Logic's Smart Controls function to allow for easy mixing. Sounds are sent to groups, from which they can be level-balanced, effected, panned and tweaked en masse, or selected one by one so that their individual parameters can be adjusted. In this way, you can tune, adjust envelope shapes or configure a host of other qualities for each sound. As seasoned Logic users will know, a drum machine called Ultrabeat is already included, but Drum Machine Designer won't tread on its toes. Consider Ultrabeat as a drum instrument capable of hosting multiple sound sources (synthetic, physically modelled and sampled) and Drum Machine Designer as a much more immediate beat creation tool. And pleasingly, with the new plug-in comes a comprehensive collection of new sounds.
 If you use Logic's Piano Roll (known to most DAW users as the note editor) to make patterns, there are developments here, too. This is usually the place where notes are created if they're not being played live, but until now, its display has always shown the whole keyboard range from bottom to top. This is frustrating if you're programming a pattern or sequence where your chosen notes are separated by several intervening ones, and on laptop screens particularly, this regularly requires users to unnecessarily scroll up and down. Under such circumstances, the new Collapse Mode will prove useful, as it shows only keys to which MIDI notes have already been assigned. Working with a kick and snare pattern? You'll only see C1 and D1 in the Piano Roll display if you've got Collapse mode selected. Unclick it to the normal display to add a hat or clap, then shrink it back down and you'll see it's grown in size to accommodate any new notes. It's a great space saver, and it means you won't inadvertently add events for sounds or notes by accident.
You'll find the new Brush tool in the Piano Roll display. This is designed to help you create running sequences of notes with a single click and drag. If you've ever wanted a 1/16-note snare fill to play through a couple of bars, you've either had to click the same note 32 times or create a few notes and copy them into subsequent note spaces. No more. Now, grab Brush mode and swipe across the Piano Roll display to create a new note in each grid space.
If you use Logic's Piano Roll (known to most DAW users as the note editor) to make patterns, there are developments here, too. This is usually the place where notes are created if they're not being played live, but until now, its display has always shown the whole keyboard range from bottom to top. This is frustrating if you're programming a pattern or sequence where your chosen notes are separated by several intervening ones, and on laptop screens particularly, this regularly requires users to unnecessarily scroll up and down. Under such circumstances, the new Collapse Mode will prove useful, as it shows only keys to which MIDI notes have already been assigned. Working with a kick and snare pattern? You'll only see C1 and D1 in the Piano Roll display if you've got Collapse mode selected. Unclick it to the normal display to add a hat or clap, then shrink it back down and you'll see it's grown in size to accommodate any new notes. It's a great space saver, and it means you won't inadvertently add events for sounds or notes by accident.
You'll find the new Brush tool in the Piano Roll display. This is designed to help you create running sequences of notes with a single click and drag. If you've ever wanted a 1/16-note snare fill to play through a couple of bars, you've either had to click the same note 32 times or create a few notes and copy them into subsequent note spaces. No more. Now, grab Brush mode and swipe across the Piano Roll display to create a new note in each grid space.
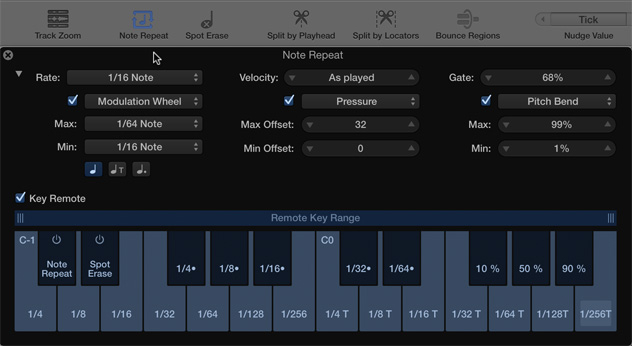 MIDI manipulation continues with real-time tools, too. Note Repeat offers a flexible system for capturing repeating notes on the fly. By default, this function is hidden in the toolbar, which is most easily opened via the View menu. Even then, you'll need to click the little triangle in the Note Repeat's editor to really understand its potential. If you want to hold down a note or chord and hear it chopped into repeating 1/8 or 1/16 notes, Note Repeat is for you—at its most basic level, it allows you to choose a gate length for how long or short each chop will be, and create a velocity offset if required, too. However, you can make things more interesting by assigning a real-time control to each of these parameters, meaning that with a flick of your mod wheel, for example, your gated sequence could move from 1/4 notes to 1/64 notes, allowing you to create crazy patterns on the fly. Any recorded sequence can be further edited with Spot Erase, which lets you wipe out notes just as easily as you created them.
The design of Logic's plug-ins hasn't aged well, and it was with some surprise that many of these remained the same as 9 transitioned to X; the Channel EQ, however, was updated with one of the subsequent revisions to Logic X. That continues now with a radical redesign of Logic's compressor. This has always been a great-sounding Logic plug-in, so it's good news that the Compressor plug-in has undergone a radical design shift. Now, the algorithms and modelled circuits are brought to the fore (rather than buried in a menu), and for each one, an appropriate design has been tailored, echoing the approach favoured by classic gear of yesteryear. Each compressor algorithm now features a VU meter as well as a digital display, and further options include extended control over sidechained input sources. It feels like a new plug-in, and it's far more ergonomic to use.
Logic's Automation controls are also expanded within the 10.1 update. Perhaps the most useful new feature is the addition of region-based automation, which can be used alongside the track automation Logic users will already know well. Simply put, region automation allows you to create automation parameters for a single region, which can be copied and moved along with a clip. It's frequently the case that certain automation parameters need to repeat every bar or so—the decay time of a synth part, for example—and other parameters will need to evolve over a much longer period, such as a steady filter rise over eight bars. Now, this is simple: create your single bar synth part, then create the decay offset as a piece of region automation before copying it. Then, flick across to track-based automation and draw your eight-bar filter rise.
Two new automation modes are provided as well, both of which allow you to edit existing automation lines. Relative and Trim modes let you ride a fader to create offsets between an existing automation line and a new value. So if on listening back to a mix, the level of a lead vocal sounds wrong in the verse but perfect in the chorus, you can ride a new level in for the offending section using the existing volume automation as a guide. Both save having to select areas of existing automation and create changes offline, and both are hugely welcome.
Another function that's been exclusively offline until now has been Logic's handling of fades. Whether fading out at the end of an audio file or cross-fading between two adjacent audio files on a single track, any fades Logic has created has prompted the saving of a separate fade file. As a result, Logic's fades have never played back in real-time; to hear a fade come into effect, you've had to press stop, then play again. Now you can adjust fades at will, and their settings update on the fly.
Another new feature is a plug-in manager, which allows you to configure plug-ins by type or within your own new folder names, rather than by manufacturer. If you want an aggregate distortion folder, for example, you can easily make one. This is great news, particularly for those with extensive plug-in collections. Also new is the option to import your own audio files in Retro Synth for use as wavetables for further sound design—a neat and unexpected development. There are further redesign touches added to Logic's mixer, too. And the new audio content available for download as part of the update isn't limited to new sounds for Drum Machine Designer; among them is a collection of choice Mellotron samples hosted through the EXS24.
In short, Logic Pro X 10.1 offers much more than regular Logic users are used to seeing in an incremental update. It's worth downloading immediately if you're an existing Logic user, and if you're planning a DAW purchase but haven't quite decided which way to jump, the whole Logic package just got more enticing for potential newcomers, too.
Ratings:
Cost: 4.8
Versatility: 4.8
Sound: 4.8
Ease of use: 4.0
MIDI manipulation continues with real-time tools, too. Note Repeat offers a flexible system for capturing repeating notes on the fly. By default, this function is hidden in the toolbar, which is most easily opened via the View menu. Even then, you'll need to click the little triangle in the Note Repeat's editor to really understand its potential. If you want to hold down a note or chord and hear it chopped into repeating 1/8 or 1/16 notes, Note Repeat is for you—at its most basic level, it allows you to choose a gate length for how long or short each chop will be, and create a velocity offset if required, too. However, you can make things more interesting by assigning a real-time control to each of these parameters, meaning that with a flick of your mod wheel, for example, your gated sequence could move from 1/4 notes to 1/64 notes, allowing you to create crazy patterns on the fly. Any recorded sequence can be further edited with Spot Erase, which lets you wipe out notes just as easily as you created them.
The design of Logic's plug-ins hasn't aged well, and it was with some surprise that many of these remained the same as 9 transitioned to X; the Channel EQ, however, was updated with one of the subsequent revisions to Logic X. That continues now with a radical redesign of Logic's compressor. This has always been a great-sounding Logic plug-in, so it's good news that the Compressor plug-in has undergone a radical design shift. Now, the algorithms and modelled circuits are brought to the fore (rather than buried in a menu), and for each one, an appropriate design has been tailored, echoing the approach favoured by classic gear of yesteryear. Each compressor algorithm now features a VU meter as well as a digital display, and further options include extended control over sidechained input sources. It feels like a new plug-in, and it's far more ergonomic to use.
Logic's Automation controls are also expanded within the 10.1 update. Perhaps the most useful new feature is the addition of region-based automation, which can be used alongside the track automation Logic users will already know well. Simply put, region automation allows you to create automation parameters for a single region, which can be copied and moved along with a clip. It's frequently the case that certain automation parameters need to repeat every bar or so—the decay time of a synth part, for example—and other parameters will need to evolve over a much longer period, such as a steady filter rise over eight bars. Now, this is simple: create your single bar synth part, then create the decay offset as a piece of region automation before copying it. Then, flick across to track-based automation and draw your eight-bar filter rise.
Two new automation modes are provided as well, both of which allow you to edit existing automation lines. Relative and Trim modes let you ride a fader to create offsets between an existing automation line and a new value. So if on listening back to a mix, the level of a lead vocal sounds wrong in the verse but perfect in the chorus, you can ride a new level in for the offending section using the existing volume automation as a guide. Both save having to select areas of existing automation and create changes offline, and both are hugely welcome.
Another function that's been exclusively offline until now has been Logic's handling of fades. Whether fading out at the end of an audio file or cross-fading between two adjacent audio files on a single track, any fades Logic has created has prompted the saving of a separate fade file. As a result, Logic's fades have never played back in real-time; to hear a fade come into effect, you've had to press stop, then play again. Now you can adjust fades at will, and their settings update on the fly.
Another new feature is a plug-in manager, which allows you to configure plug-ins by type or within your own new folder names, rather than by manufacturer. If you want an aggregate distortion folder, for example, you can easily make one. This is great news, particularly for those with extensive plug-in collections. Also new is the option to import your own audio files in Retro Synth for use as wavetables for further sound design—a neat and unexpected development. There are further redesign touches added to Logic's mixer, too. And the new audio content available for download as part of the update isn't limited to new sounds for Drum Machine Designer; among them is a collection of choice Mellotron samples hosted through the EXS24.
In short, Logic Pro X 10.1 offers much more than regular Logic users are used to seeing in an incremental update. It's worth downloading immediately if you're an existing Logic user, and if you're planning a DAW purchase but haven't quite decided which way to jump, the whole Logic package just got more enticing for potential newcomers, too.
Ratings:
Cost: 4.8
Versatility: 4.8
Sound: 4.8
Ease of use: 4.0